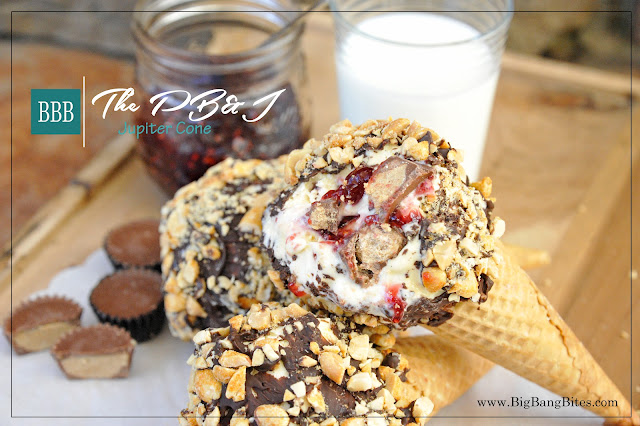
I have a huge organic garden and every year I make homemade jam for my family and friends. Needless to say, with all that jam, my girls grew up eating a lot of peanut butter and jelly sandwiches. Well, peanut butter and jam sandwiches, but that just doesn’t sound right. Anyway, the girls were over the other day when I was making a batch of raspberry jam, and while they sopped up the warm, sticky jam left on the bottom of the pot with pieces of bread, one of them asked when I was going to create another Jupiter Cone. Aha! “How about raspberry jam with peanut butter?”
So, Jupiter Cone number five is the PB&J. This is a hefty one. When I made these, my daughter took them to her friend’s house for dessert after dinner. When she pulled them out of the freezer, her friend said, "Oh my gosh, had I known they were THIS big, I wouldn’t have eaten that extra slice of pizza!"
The vanilla ice cream in this cone is oozing with raspberry jam and dotted with chunks of peanut butter cups. And if that’s not enough peanutty-ness for you, the chocolate topping is crusted with salted peanuts.
Before you get started…..
Before I start building my cones, I like to coat the insides of the sugar cones with melted Wilton Candy Melts. I like the decadence of the extra chocolate and it keeps the cones crispy for a long time. I always have those candy melts on hand for other desserts, but this can be an optional step. I also use the regular size peanut butter cut cups into fourths, instead of using the minis because you get more peanut butter.
Makes 8 – 10 cones
- 1 half gallon vanilla ice cream
- 8 – 10 sugar cones
- 32 – 40 regular size peanut butter cups, cut into fourths
- about ¾ cup of raspberry jam
- 1 cup rough chopped salted peanuts
- 1 pkg. Wilton’s Dark Chocolate Candy Melts
If you’re going to coat the insides of the cones, melt a handful of the Wilton Candy Melts per package direction. Brush it on the insides in a thin layer. It hardens quickly, so when you’re done with the last one, you can start building the cones. Save any melted chocolate for coating the drumsticks.
Put a little ice cream in the bottom, then start adding the pieces of peanut butter cups along with some raspberry jam. Just keep alternating everything until the cone is full. When you get to the dome part of the cone, you have to work in layers as you add more peanut butter cups and jam. I use a serving spoon to scoop the ice cream into flat layers, then wrap it around the filling. Use the back of the spoon to smooth the ice cream layers. You should end up with only ice cream showing on the dome.
After you make each cone, put them in the freezer. You can lay them on a wax-papered lined pan, or set each one in a coffee cup to stand in the freezer. Freeze for 1 to 2 hours, but no longer, as they might pick up that freezer taste. Nasty.
Melt the rest of the chocolate candy melts in the bowl with the remaining chocolate from before. Using a bristled pastry brush, paint a coating of chocolate on only a section of the ice cream dome and part of the sugar cone, as the candy melt solidifies pretty fast. Immediately sprinkle the peanuts on the solidifying candy melt. Continue around the whole cone and put back into freezer while you do the rest of them. If you have some bald spots, use a spoon to drizzle on some candy melt and add more peanuts. When you’ve finished making all of them, store in a zip lock bag.


No comments:
Post a Comment